
In my first This is How I Work post, I wrote generally about how I get work done fast but with good quality (in other words, efficiently). I wrote about a lot of apps and services that I use, and time-saving hacks. But that post was not specifically relevant to the scientific writing that I do, necessarily. In fact, most of that post could apply to people in many different, non-academic/scientific careers.
In this post, mainly geared toward young/early career academic scientists and students, I write about how I get a manuscript written – from start to finish. I’ve done a lot of writing (mostly journal articles) in my career so far, and this post is about how I get it done.
I’m not going to start with the initial conception of a scientific study, or how I collect data, because that discussion would be technical, discipline-dependent, and takes graduate training in research methodology and design in order to understand.
Let me start at this point in the process… Let’s say I just finished collecting human subjects data for an empirical research study in my field (clinical psychology). Let’s assume that I have cleaned the dataset, in order to render it amenable for data analysis. And now I want to analyze the data and write a manuscript based on the results. This is an important part of the process for me to discuss here, because it’s easy for early career scientists to: a) have data but lack the organizational skills to know how to proceed with analysis and write-up; b) get overwhelmed after acquiring data in starting to write a manuscript; and c) get writer’s block while working on the manuscript.
It’s important to emphasize that at least in my mind (if not on paper), I already would have an idea of the types of analyses that I want to conduct – in fact, I would have an idea of this before I collect the data, because my planned analyses (planned beforehand) would impact the types of data that I collect, including measures and instruments. And my planned analyses are driven by prior theoretical frameworks and prior data analyses that have been published. So it’s important to have this mapped out in advance.
But knowing the types of analyses and research questions I want to analyze comes with experience. For students starting out, this is where an advisor is helpful to the student in providing a kick-start and training. Sometimes, however, students are provided access to a dataset (perhaps from their advisor or a collaborator) and are asked to “come up with some analyses/research questions.” I would highly recommend having a discussion with the advisor/collaborator to gather some more instructions, training and detail.
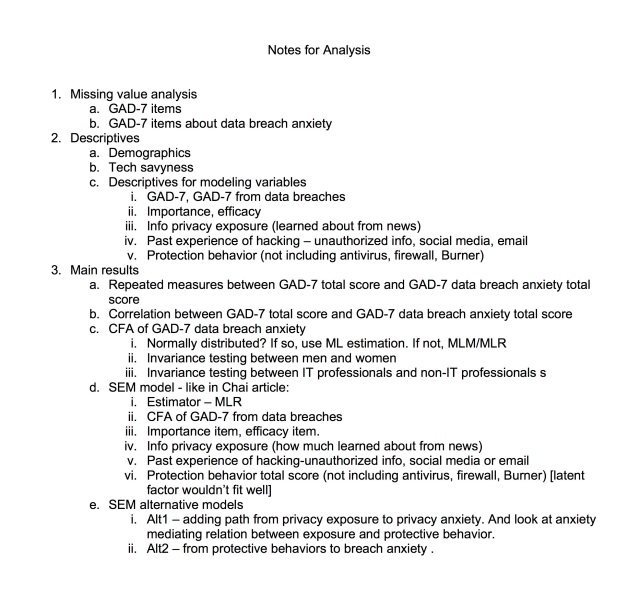
Just before I conduct any data analyses, I prepare a checklist of the steps that I will need to accomplish in the analyses. I believe that it is so important to have a checklist for analysis, so that I don’t forget something important (e.g., checking of normality, which would impact the analyses); and so that I don’t get lost in analysis, conducting many, possibly extraneous analyses. Creating and sticking to a checklist helps ensure that I get the analyses done that I have thoughtfully considered are important, and also ensures that I don’t get distracted with analyses that aren’t important or relevant. Typically I’ll generate a checklist using a basic plaintext editor app; I usually use Write. Here’s an example (though I used MS Word for it). Even better (although not in this checklist) would be to explicitly tie each analytic point on the outline to the specific research question or hypothesis the particular analysis is trying to answer.
It is true that I typically conduct some analyses before writing up the manuscript. This is mainly because I often use complex, latent variable modeling analyses, which sometimes mathematically don’t run; and it is helpful to determine this before spending the time on a manuscript. So I’ll run the primary analyses first (after quickly checking their statistical assumptions to ensure no violations), to see if they run, even before conducting any less central analyses, such as demographic characteristic analysis. This does not mean that I’m data fishing – or, running my analyses in order to generate hypotheses that “conveniently” correspond with the results I just found. Rather, this is merely a productivity hack such that I don’t waste hours writing an Introduction for a study where I just can’t get any analyses to run.
One question that my students sometimes ask is: How do you know/remember how to compute a particular type of analysis? Some types of analyses are basic enough, and I received enough training and had enough experience with them that I won’t likely ever forget how to compute them – such as a traditional linear regression model. Other, more complex, analysis types are ones that I learned either through reading books or watching videos. For these more complex analyses, I always take detailed notes (a cheat sheet) when learning them, that I can refer to later. Therefore, if I’m now computing a complex analysis that I don’t use on a daily basis, I will refer to my cheat sheet to remind me of the important details in using it.
When using statistical modeling, one of my first steps is to draw a model(s), including the predictor variables, mediating, and dependent variables. This is helpful in allowing me to easily visualize what I’m working with. I want the model diagrams to look good and clean to me, and also for publication if the diagrams are used in manuscripts. In order to make the diagrams easy for me to use, manipulate, and look good, I use vector-based drawing software to generate the diagrams. Vector drawing art is a type of computer graphics drawing that graphic designers and professional artists use to draw animation and art. Using vector drawing is very helpful, because it assists in lining up elements of the diagram perfectly, so that squares and circles line up perfectly, are set to be perfectly equidistant from each other, etc. I usually use Google Drive’s Drawing feature to accomplish this (saving the file in .svg format, for higher quality). This can be helpful with complex models. But drawing simple diagrams can even be helpful for other similar purposes, such as drawing a 2 x 2 ANOVA representation to get a better handle on independent and dependent variables. Also helpful is drawing a diagram for tracking patient flow.
Most of the data analyses I conduct are with the Mplus software, which lets me use structural equation modeling, mixture modeling, multilevel modeling, as well as basic regression-based models. Referring to my diagrams that I created helps ensure that I am specifying the correct models in Mplus, and that I’m not committing specification errors (e.g., specifying a path that I did not intend to test; or neglecting to specify a path that I meant to test). Most typically I’m running multiple models for a paper – testing different subcomponents of a model, and/or building up from a smaller model to include more variables in the final, comprehensive model. I can’t plan all of this out ahead of time, because the nature of the data will dictate some of the specific features of the modeling approach (e.g., if I find that my dependent variables are non-normally distributed, that would call for a different modeling estimation approach than if the variables are normally distributed). I may have to test multiple models, with several iterations and tweaks until having a good idea as to what the final models and results look like.
One thing I really like about Mplus is that it’s a very lightweight program, that doesn’t typically require much RAM or processing power. Thus it’s fast when opening and manipulating files. In contrast, when I use IBM SPSS software for more basic analyses, it’s a very clunky program, that takes time to open and manipulate files, and hogs a lot of computer RAM (even with my solid state, fast computer that has lots of RAM). As a result, when performing data analyses using SPSS, I’ll typically save the output not only as SPSS output files, but also as pdf files. This way, I can easily and quickly open the pdf files later when referring to the results while writing my manuscript (bonus: I can open these files on any device because of the universality of the pdf format, in contrast to the propriety nature of SPSS output files).
Once I have most of my analyses conducted, I’ll start writing the manuscript. I find that in writing the manuscript, it helps me (my productivity, and my satisfaction) to set up camp at a local coffeeshop to do so. I’ll usually take my laptop there, put on my headphones and listen to music while writing. I love good coffee in general; and when trying to write, the caffeine from coffee really helps stimulate the writing process for me.
I’ll start my writing process by composing an outline in the Write app. Why would I use a simple text editor that doesn’t have formatting features, like MS Word or Apple’s Pages apps would have? There are good reasons why I do this. First, many simple text editors such as Write provide distraction-free writing, because there is a clean, white, minimalistic interface with no clutter from formatting buttons. Try opening up MS Word right now, and imagine how different it would look if there were absolutely no formatting buttons at the top or bottom of the interface – that’s what Write looks like, so you can focus only on the page and text. It reduces distractions from seeing the clutter from those visual formatting buttons. Second, it also prevents you from formatting your document. Your main job in writing your first draft is getting the words onto the page – not formatting text, such as outline, bold, etc. – formatting is easy, and you can do it later on, after you’ve written your manuscript. Third, a plaintext file format (e.g., .txt file) is one of the most widely supported file formats across devices. This way, I can easily continue writing my manuscript on any device I own, even if it’s a mobile device that doesn’t have MS Word installed.
Back to my outline… An outline is so very important in starting the writing process. Without an outline, I’d be completely lost in writing the manuscript; I would likely go on tangents of irrelevance (kinda like in this blog post!), in which case my paper would read as disorganized and without logical flow. Therefore, I’ll start by constructing an outline that briefly indicates the major points of each paragraph that I want to get across – in the Introduction/Literature Review section. So for the Introduction, maybe I’ll have 5-10 paragraphs, and I’ll write roughly 1-2 phrases for each of these paragraphs.
For the outline, essentially, I’m trying to jot down a “story” that sounds coherently pieced together that takes me from prior research to the aims of the present study. My aims in creating the outline for the Introduction are to discuss theory related to my work, previous relevant research findings, and leading the reader to how the present study is the next logical step to conduct, given the past theory and previous research findings. I really want an Introduction that logically flows in a way such as this: past relevant research findings->past theory to contextualize these findings->what’s missing from past research->what the purpose is of this study->research aims and hypotheses of this study. I’ll do my best to draft an initial outline, and then I’ll read it back to myself, using a critical eye to ask myself “Does this logically flow? Does this point makes sense to lead to the next point, or is there an intermediate point that is needed in-between in order to make better sense? Does one point seem to come out of nowhere because it actually should be placed after another point? Does this point seem to fit in its place, or does it seem irrelevant to the current discussion and should be dropped?” I don’t think that I’ve gotten better over time in drafting the initial outline; but rather, I’ve gotten better over time at editing and rearranging the outline so that it makes more coherent, linear sense.
I should note that there are times when I do not use theory in my papers. For example, if I’m writing a paper that essentially is a brief report detailing a psychometric validation of an assessment instrument, perhaps no theory will come up in that sort of paper. Also, in more recent years, I’ve gotten more adapt in weaving theory into my manuscripts, having been not as good at this previously.
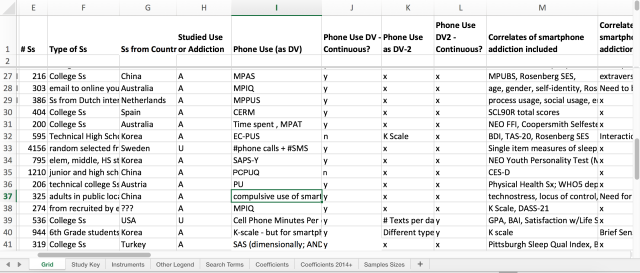
One question that often comes up from students is something like this… “I just read 50 articles. But now I have to summarize the past research findings from these papers in my Introduction, and I don’t even know where to start.” This is where creating a spreadsheet of articles is incredibly helpful. It’s difficult to get a snapshot of the status of research from a stack of 50 articles. So it is important to distill important aspects of those articles into a spreadsheet, where each row represents a different article, and each column represents an important variable or issue worth discussing in your manuscript.
For example, in this snapshot of one of my recent spreadsheets, I am able to keep track of all the relevant studies, characteristics of the samples (toward the left), how the variables were measured (around the middle), and which correlate variables were studied (right). This makes it much easier in your Introduction to summarize the commonly used methods, the results of past studies, etc.
After I settle on a bare bones outline, I go back and elaborate on the main points that I want to get across in each paragraph, and insert information about particular papers I want to cite to back up each point – I don’t format complete citations/references at this point; I just jot down the author/year of papers I want to cite.
Again, at this point, I’m still using a plaintext editor app for writing, so I’m not worried about formatting – just plaintext writing. Also, at this point, I’m not worried about making the sentences sound well-written, or even complete. Basically, I’m just jotting down my thoughts without editing my language; in fact, I’m using my natural typing language, just to get it down onto the computer file; I’ll worry about editing much later in the process.
Still being at the coffeeshop, I’ll be sitting there for hours in a row while doing this work. It’s really important for me to have a block of several hours, because it may take me some time once I start a writing session to really get into a comfortable writing flow. So four sessions of one hour each won’t likely be as productive to me as a four-hour writing session. Though sometimes I only may have an hour available to get some writing done. Focusing on getting my first thoughts down, and avoiding formatting and editing, helps me make the most of a short writing session like that.
While writing, I may get writer’s block at times. Specifically, I may find myself staring into space, or confused about the direction in which I want to take the paper, etc. And to overcome that, I’ll try a couple things. First, I’ll get up and stretch, maybe order another coffee or snack or take a break outside to clear my head a bit. Second, I’ll return to writing and just try to work through the writer’s block by just pushing ahead, though mentally painful, and trying to write and think more. Third, I may even drive to another location to get a change of scenery – and work from a different coffeeshop. After some struggle, I usually break through and can continue getting writing done.
Distraction can be a problem. Sometimes my mind will wander while writing, and I’ll be tempted to check my email, or my phone messages, or social media. Often I find it helpful to put my phone on Do Not Disturb mode, and close other apps and browsers while writing. Or I’ll use the Forest app, which is kind of like a “game” whereby it plants virtual trees in the app for a period of time that I specify (e.g., 40 minutes), but destroys them if I check my phone before Forest’s timer indicates that my session is complete. Thus you’re reinforced for not using your phone by successfully having virtual trees planted. I’ll also reward myself by taking a short email/social media break after getting some work done (e.g., after successfully writing a prominent paragraph).
I might spend an entire 1-2 days of 4-6 hours each working on the Introduction – shaping it gradually from a bare bones outline, until the end of the second day, when it would be a fairly complete, well-edited and worded literature review (though still not formatted). I’m helped in doing this because I would be familiar with the literature on which I’m writing. In fact, that’s one of the advantages of having a narrowly-focused research program – you don’t end up scattered and having to learn many different types of literature. However, while I may have written a previous similar study in my narrow research program, I feel that it’s important not to copy and paste text from the previous paper. Doing so would render my work derivative of my previous work, self-plagiarizing, and not fresh. Instead, I always write from scratch; I may refer to prior work that I’ve done, but not by copying and pasting.
Of course at this point, even being well-familiar with the relevant literature, I often need to fill in some holes in the literature review by looking up other relevant papers to discuss and cite/reference. I find that it’s easiest and fastest for me to find academic/scientific resources by using Google Scholar, which gives fast academic bibliographic searches, often linking to full-text articles. In my field, there are more comprehensive and relevant databases to search (i.e., PsycINFO) for when I’m conducting a comprehensive literature search. But Google Scholar is perfect for filling in holes in my literature, because it’s fast and much less clunky than PsycINFO.
After I write the Introduction, I’ll continue on and draft the Method section (still using my plaintext editor app). By the way – someone asked me recently why I write the Introduction section first; and is it easier or more helpful to write the rest of the paper and save the Introduction for last? There are a couple of reasons why I write the Introduction first: 1) It helps me collect and organize my thoughts about the background and rationale, in assisting me in writing other sections of the paper; 2) It probably requires the most thought, time and hard work from me, so I want to do it first and get it over with.
Back to the Method section… This is probably the easiest section for me to write, because I already know the methodology, including procedure and instruments, from when I originally designed the study and collected the data. But still, I will start writing the Method section using a similarly free-flow, unedited, approach to writing like I took in the Introduction; I’ll fix it later. I might spend an entire day on writing the Method section. Some parts of the Method section are sections that I need to run some data analysis to complete – such as reliability estimates for the measures, and descriptive calculations for demographic characteristics; typically I’ll insert a placeholder where these will go, but I’ll get to them later. When finishing a first draft of my Method section, that’s when I go back and fix my writing.
Next, writing the Results section is fairly easy; after all, I’ve already conducted the primary analyses. Therefore, at this point, I’m primarily writing up the details of the analyses that I conducted. And as I’m writing up the results, I may realize that there are some additional analyses that would be helpful for me to conduct, so I will compute them. I might need to refer back to similar papers of mine that used similar types of analyses, to ensure that I did not forget to mention something important about the analytic procedures; I may refer to my statistics cheat sheets that I mentioned above. And I find it helpful to refer the reader to the particular hypothesis relevant to each analysis I’m presenting. This working up the Results section may take me a full day of writing. And I’ll then revise the Results section and elaborate.
At this point, I’ll work on an outline of my Discussion section. Earlier in my career, I dreaded writing the Discussion sections of my papers. It was difficult to write, I didn’t know exactly what to write, and didn’t really feel like I had much relevant stuff to say. But now I find it easier, and more enjoyable. What changed over the years? Well, first, I now have more knowledge of the research content areas, which helps me generate text to write in the Discussion, in tying together the results I found from the analyses with the prior literature. Second, I’ve written tons of Discussion sections by now, so I’ve just gotten better with practice. It just takes time and experience – to gain a broad understanding of the prior literature. But the other thing I find is that following a template for how the Discussion should be written helps make it much easier to write. My template basically involves this… Each paragraph centers on a different hypothesis. Within a given paragraph, I do the following: a) reiterate my hypothesis, b) discuss whether the analysis supported or did not support the hypothesis, c) place the finding in the context of prior relevant literature (including relevant citations), and d) tie this back to relevant theory that I mentioned in the Introduction. Using this structure really helps me write the Discussion. And probably the most compelling Discussion sections are those that a) adequately tie together the present study’s findings into the context of prior research studies’ research findings; and b) discuss the relevance of the findings to related theoretical work. The least compelling Discussions are ones that simply reiterate what was found in the Results section. Finally, I’ll add a paragraph at the end that discusses limitations of my study, and future research. Then I’ll revise the Discussion, elaborate, and formalize the writing.
At this point, I’ll have a fairly complete document (Introduction, Method, Results and Discussion) – albeit in plaintext format. So here, I’ll copy the document’s text into MS Word. And I’ll format the document, using proper fonts, underlining, bold, etc.
The other thing I do at this point is format the citations and references. This involves taking my plaintext document’s citations that I had jotted down and formatting them properly. I use the Endnote software for bibliographic referencing; though other popular reference manager apps include Zotero and Mendeley, among others. For those not familiar with reference managers – they are a tremendous productivity hack. I can speak most to Endnote, but my understanding is that others work similarly. With Endnote, I keep the reference information and article pdfs for the 2000+ articles I’ve collected over the years in a single place – my Endnote database. My Endnote database has all of this centrally located (in fact in my Dropbox account, so that I can keep it synced across devices). I have keywords in my Endnote database, so that I can easily search for specific articles based on particular keywords that I’ve assigned. This makes writing a manuscript helpful in terms of content because I can easily locate relevant articles from my Endnote database to cite and discuss in my manuscript. And from a productivity perspective, it helps me save time by cutting down on searching through my previous manuscripts or files for particular references. Importantly, it is very easy when writing with Endnote to reformat a manuscript’s reference style to a different reference format (with just a couple of clicks) – such as if I had a manuscript rejected by a journal that uses APA format and I subsequently want to submit the paper to a journal that requires a different referencing format.
I’ll still read the document a few more times and revise/improve it. This is key, because before, I was just writing one section at a time. Having a few reads from front to end and further editing helps further improve logical flow.
This is the point when I’ll send my edited draft to my collaborators – typically, one collaborator at a time (so that I don’t have multiple, separate versions returned to me for editing) – usually in the order of authorship. Sometimes I’ll have specific questions for a particular collaborator based on their specific expertise that I’m hoping they can give me feedback on and address in the manuscript. Other times, I don’t have specific questions, but I’m looking for the collaborator to do a thorough read of the paper and see what kinds of suggestions they have. It might only take a couple of weeks to get sequential feedback from perhaps 3-4 collaborators – especially because I tend to most often work with collaborators who give good feedback in a prompt time-frame. (I don’t usually work with collaborators a second time after learning through experience that they don’t provide prompt feedback). Typically when I receive a co-author’s edits, I’ll integrate the edits before sending a slightly revised version to the next co-author on the list. This process is sequential and thus not as efficient as if I posted a draft on Google Drive for my co-authors to remotely and possibly simultaneously edit. However, it isn’t possible to use Endnote with Google Drive documents.
Finally, I will determine which journal I intend to submit my manuscript to (In fact, I will have an upcoming blog post on how I select journals to submit to). I’ll check the journal’s website for specific instructions on formatting for that particular journal. And I will slightly reformat the document based on that journal’s required format. Usually this just means revising the referencing style (with a few clicks in Endnote). But it could mean cutting out some text, if my paper is too long for the journal’s required word count. For example, I may start with a 4500-word document but I want to submit it to a journal that allows no more than 3500 words. So in this case, I may shorten my manuscript and have a resulting 3500-word version. I’ll shorten my manuscript but going through it with a fine-toothed comb and asking myself – “Is this passage absolutely necessary to the logical flow?” Typically I’ll find passages of hundreds of words each where my answer is “no,” and I will cut those passages. But I’ll still keep my 4500-word version, in case the journal rejects my paper, and I subsequently submit it to a journal that has a higher word count limit.
So that’s basically my manuscript writing process, from start to finish.
—–
Jon Elhai
—–
Thanks to Steph Wells, Sam Lustgarten, Ateka Contractor, Jason Levine, and RaeAnn Anderson for providing suggestions to me on an earlier draft of this post.


Very helpful~! Thank you !
LikeLiked by 1 person
[…] management strategies in my previous post on how I work. And I discussed avoiding distractions in my post about manuscript writing. In the present post, I discuss how to deal with all this unwanted academic-related […]
LikeLike
[…] get ready to write another paper after the hiatus. For more on my writing process, see this other post of […]
LikeLike
[…] management strategies in my previous post on how I work. And I discussed avoiding distractions in my post about manuscript writing. In the present post, I discuss how to deal with all this unwanted academic-related email, so […]
LikeLike